ユーザ認証を行ってみましょう(参考: Getting Started · Securing a Web Application)。
spring-boot-starter-security
Springにはセキュリティ関係の機能をサポートするSpring Securityがあり、またSpring Bootで利用する場合はspring-boot-starter-securityを使うことができます。build.gradleのdependenciesに追加します。
|
29 30 31 32 33 34 35 36 37 38 39 |
dependencies { compile("org.springframework.boot:spring-boot-starter-web") { exclude module: "spring-boot-starter-tomcat" } compile("org.springframework.boot:spring-boot-starter-jetty") compile("org.springframework.boot:spring-boot-starter-thymeleaf") compile("org.springframework.boot:spring-boot-starter-data-jpa") compile("com.h2database:h2:1.4.181") compile("org.springframework.boot:spring-boot-starter-security") testCompile group: 'junit', name: 'junit', version: '4.11' } |
ログインフォーム
まずログインフォームを作り、アクセスできるようにしておきます。
テンプレートは、/loginにusernameとpasswordを送るようにします。
|
1 2 3 4 5 6 7 8 9 10 11 12 13 14 15 16 17 |
<!DOCTYPE html> <html xmlns:th="http://www.thymeleaf.org"> <head> <meta charset="UTF-8" /> <title>login</title> </head> <body> <div th:if="${param.error}"> エラー: ユーザ名・パスワードが違います。 </div> <form th:action="@{/login}" method="post"> <div><label>ユーザ名: <input type="text" name="username"/> </label></div> <div><label>パスワード: <input type="password" name="password"/> </label></div> <div><input type="submit" value="ログイン"/></div> </form> </body> </html> |
コントローラでは/loginにアクセスがあったときに上記のテンプレートが表示されるようにします。Getting Started · Securing a Web Applicationでは、WebMvcConfigurerAdapterを使ってビューを追加していますが、どちらでも構いません。
|
1 2 3 4 |
@RequestMapping("login") public String login() { return "login"; } |
WebSecurityConfigurerAdapter
WebSecurityConfigurerAdapterを継承した設定用クラスを作り、overrideしたconfigureメソッドで設定を行います。
|
1 2 3 4 5 6 7 8 9 10 11 12 13 14 15 16 17 18 19 20 21 22 23 24 25 26 27 28 |
package net.teachingprogramming.mybootapp.config; import org.springframework.context.annotation.Configuration; import org.springframework.security.config.annotation.authentication.builders.AuthenticationManagerBuilder; import org.springframework.security.config.annotation.authentication.configurers.GlobalAuthenticationConfigurerAdapter; import org.springframework.security.config.annotation.web.builders.HttpSecurity; import org.springframework.security.config.annotation.web.configuration.WebSecurityConfigurerAdapter; import org.springframework.security.config.annotation.web.servlet.configuration.EnableWebMvcSecurity; @Configuration @EnableWebMvcSecurity public class WebSecurityConfig extends WebSecurityConfigurerAdapter { @Override protected void configure(HttpSecurity http) throws Exception { http.authorizeRequests().antMatchers("/").permitAll().anyRequest().authenticated(); http.formLogin().loginPage("/login").permitAll().and().logout().permitAll(); } @Configuration protected static class AuthenticationConfiguration extends GlobalAuthenticationConfigurerAdapter { @Override public void init(AuthenticationManagerBuilder auth) throws Exception { auth.inMemoryAuthentication().withUser("user1").password("password1").roles("USER"); auth.inMemoryAuthentication().withUser("user2").password("password2").roles("USER"); } } } |
- 10行目: 設定用クラスであることを指定する。
- 11行目: Spring Securityのウェブ用の機能を利用することを指定する。
- 14〜18行目: configureメソッドをoverrideし、ここで設定を行う。16行目ではトップページ(/)は認証無しでアクセス可、それ以外は認証が必要なことを設定している。複数のページを認証なしでアクセス可とする場合は「antMatchers(“/”, “/sample”)」のように複数指定することができる。17行目ではログインフォームのURLが/loginで、ここへのアクセスも全てのユーザがアクセス可能としている。
- 20〜27行目: GlobalAuthenticationConfigurerAdapterを継承したクラスのinitメソッドで認証するユーザとパスワードを設定する。
ログインの確認
トップページ(/)以外のページにアクセスすると/loginにリダイレクトされます。

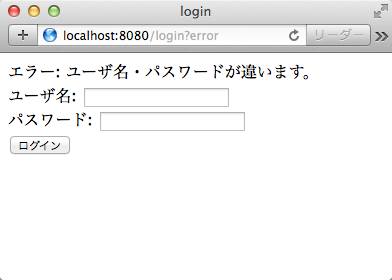
ユーザ名・パスワードがあっていれば、元のURLに移動します。ユーザ名・パスワードが間違っている場合はエラーメッセージが表示されます。
