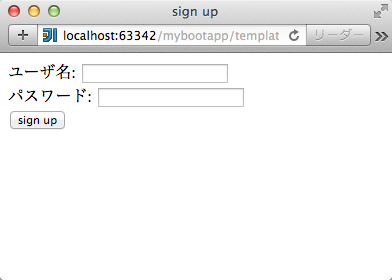
単純なログインでは、ユーザ情報をソースコードに記述し、実行時はAuthenticationManagerBuilderによって作られるメモリ上のデータベースに保存するようになっています。これではユーザの追加のたびにソースコードの修正が必要になってしまうので、ユーザ情報をデータベースに置くように変えていきましょう(参考: 3.5. Authentication)。また、ブラウザからサインアップできるようなインターフェースを作成します。
JDBC Authentication
WebSecurityConfig.javaを次のように修正します。
|
1 2 3 4 5 6 7 8 9 10 11 12 13 14 15 16 17 18 19 20 21 22 23 24 25 26 27 28 29 30 31 32 33 |
package net.teachingprogramming.mybootapp.config; import org.springframework.beans.factory.annotation.Autowired; import org.springframework.context.annotation.Configuration; import org.springframework.security.config.annotation.authentication.builders.AuthenticationManagerBuilder; import org.springframework.security.config.annotation.authentication.configurers.GlobalAuthenticationConfigurerAdapter; import org.springframework.security.config.annotation.web.builders.HttpSecurity; import org.springframework.security.config.annotation.web.configuration.WebSecurityConfigurerAdapter; import org.springframework.security.config.annotation.web.servlet.configuration.EnableWebMvcSecurity; import javax.sql.DataSource; @Configuration @EnableWebMvcSecurity public class WebSecurityConfig extends WebSecurityConfigurerAdapter { @Override protected void configure(HttpSecurity http) throws Exception { http.authorizeRequests().antMatchers("/", "/signup").permitAll().anyRequest().authenticated(); http.formLogin().loginPage("/login").permitAll().and().logout().permitAll(); } @Configuration protected static class AuthenticationConfiguration extends GlobalAuthenticationConfigurerAdapter { @Autowired private DataSource dataSource; @Override public void init(AuthenticationManagerBuilder auth) throws Exception { auth.jdbcAuthentication().dataSource(dataSource); } } } |
- 19行目: /signupもユーザ認証無しでアクセスできるようにする。
- 25,26行目: データベースを使うのでDataSourceをDIします。
- 30行目: AuthenticationManagerBuilderのjdbcAuthenticationメソッドでデータベースからユーザ情報を読み取ることを指定します。dataSourceメソッドで利用するDataSourceを指定します。
3.5.2. JDBC Authenticationでは、withDefaultSchemaメソッドを実行しています。これは、ユーザ情報用のテーブルを用意してくれる機能ですが、ここではこの機能を使わずEntityを自分で作成することにします。
EntityとRepository
ユーザ情報を格納するEntityと、Entityを扱うRepositoryを作成します。
|
1 2 3 4 5 6 7 8 9 10 11 12 13 14 15 16 17 18 19 20 21 22 23 24 25 |
package net.teachingprogramming.mybootapp.entity; import lombok.Getter; import lombok.Setter; import javax.persistence.Entity; import javax.persistence.Id; import javax.persistence.Table; @Entity @Table(name = "USERS") public class User { @Id @Setter @Getter private String username; @Setter @Getter private String password; @Getter @Setter private Boolean enabled; } |
- 11行目: AuthenticationManagerBuilderはテーブル名が「USERS」となっているテーブルから取得するためテーブル名を明示的に指定する(@Tableアノテーションを指定しない場合、テーブル名はクラス名と同じになる)。
- 14〜23行目: username、password、enabledという3つのフィールド(テーブルのcolumn)が必要となる。Lombokでgetter/setterを生成する。
|
1 2 3 4 5 6 7 |
package net.teachingprogramming.mybootapp.repository; import net.teachingprogramming.mybootapp.entity.User; import org.springframework.data.jpa.repository.JpaRepository; public interface UserRepository extends JpaRepository<User, String>{ } |
Userと同様に、Authorityを作成する。
|
1 2 3 4 5 6 7 8 9 10 11 12 13 14 15 16 17 18 19 20 21 |
package net.teachingprogramming.mybootapp.entity; import lombok.Getter; import lombok.Setter; import javax.persistence.Entity; import javax.persistence.Id; import javax.persistence.Table; @Entity @Table(name = "AUTHORITIES") public class Authority { @Id @Setter @Getter private String username; @Setter @Getter private String authority; } |
|
1 2 3 4 5 6 7 |
package net.teachingprogramming.mybootapp.repository; import net.teachingprogramming.mybootapp.entity.Authority; import org.springframework.data.jpa.repository.JpaRepository; public interface AuthorityRepository extends JpaRepository<Authority, String>{ } |
View
|
1 2 3 4 5 6 7 8 9 10 11 12 13 14 |
<!DOCTYPE html> <html xmlns:th="http://www.thymeleaf.org"> <head> <meta charset="UTF-8" /> <title>sign up</title> </head> <body> <form th:action="@{/signup}" method="post"> <div><label>ユーザ名: <input type="text" name="username"/> </label></div> <div><label>パスワード: <input type="password" name="password"/> </label></div> <div><input type="submit" value="sign up"/></div> </form> </body> </html> |

Controller
|
1 2 3 4 5 6 7 8 9 10 11 12 13 14 15 16 17 18 19 20 21 22 23 |
@Autowired private UserRepository userRepository; @Autowired private AuthorityRepository authorityRepository; @RequestMapping(value = "signup", method = RequestMethod.GET) public String signup() { return "signup"; } @RequestMapping(value = "signup", method = RequestMethod.POST) public String signup(@RequestParam String username, @RequestParam String password) { User user = new User(); user.setUsername(username); user.setPassword(password); user.setEnabled(true); userRepository.save(user); Authority authority = new Authority(); authority.setUsername(username); authority.setAuthority("ROLE_USER"); authorityRepository.save(authority); return "signup"; } |
- 1〜4行目: RepositoryをDIする。
- 6〜9行目: @RequestParamでmethodを指定するとメソッド毎に処理を分けることができる。GETの場合はviewを指定するだけ。
- 11〜23行目: POSTの場合は送られてきたパラメータを使ってUserとAuthorityのインスタンスを生成し、データベースにセーブする。
これは最も単純な場合なので、すでに同じユーザ名で登録されていた場合の処理がされていない、パスワードが平文で保存されている等いろいろ修正しなければなりませんが、とりあえずはこれでユーザ情報を登録して認証に使えるようになります。