これまで行ってきたように、ウェブアプリケーションの開発では様々なライブラリ/フレームワークを使います。grailsやmaven等のツールを用いることにより様々なライブラリ等が簡単に利用可能となりますが、それでも設定ファイルの作成等、面倒な作業が多く、ミスの元になったりします。
「Spring Boot」は「Spring Frameworkを使ってさらに簡単にウェブアプリケーションを作る仕組み」です。Spring Bootを使うことで標準的な設定がなされたウェブアプリケーションのベースを利用することができます。ただし、これまで紹介してきた設定の知識が不要になる、というわけではありません。自動設定(というか定義済み設定)が利用できるというだけで、自動で設定できない部分はこれまでと同様に設定する必要があります。
具体的には「Starter」を利用することになります。使いたい機能のStarterを加えることでライブラリの導入や設定が行われます。用意されているStarterの一覧は12.4 Starter POMsにまとめられています。
それでは、ここまで(掲示板の作成まで)と同等の環境をSpring Bootで構築してみましょう。
Gradle
プロジェクトはこれまでと同様にGradleを利用して作成し、build.gradleを次のように編集します(参考: 9.1.2 Gradle installation)。
1 2 3 4 5 6 7 8 9 10 11 12 13 14 15 16 17 18 19 20 21 22 23 24 25 26 27 28 29 |
buildscript { repositories { mavenCentral() } dependencies { classpath("org.springframework.boot:spring-boot-gradle-plugin:1.1.7.RELEASE") } } apply plugin: 'java' apply plugin: 'spring-boot' sourceCompatibility = 1.8 version = '1.0' repositories { mavenCentral() } dependencies { compile("org.springframework.boot:spring-boot-starter-web") { exclude module: "spring-boot-starter-tomcat" } compile("org.springframework.boot:spring-boot-starter-jetty") compile("org.springframework.boot:spring-boot-starter-thymeleaf") compile("org.springframework.boot:spring-boot-starter-data-jpa") compile("com.h2database:h2:1.4.181") testCompile group: 'junit', name: 'junit', version: '4.11' } |
- 1〜8, 11行目: Spring Bootのgradleプラグインを利用する。
- 21〜26行目: 利用するstarterの指定。ここではJetty(Tomcatを使わない)、Thymeleaf、Spring Data JPAを利用するように指定している。
- 27行目: H2を利用する。
起動用のクラス
Spring Bootはウェブアプリケーションを実行する環境も用意することができます(これまでと同様にwarファイルを生成することももちろんできます)。Gradleの設定ではJettyを利用するように設定しました。Jettyを起動してウェブアプリケーションを実行するクラスを作成します(参考: 13.2 Locating the main application class)。
|
|
package net.teachingprogramming.mybootapp; import org.springframework.boot.SpringApplication; import org.springframework.boot.autoconfigure.EnableAutoConfiguration; import org.springframework.context.annotation.ComponentScan; import org.springframework.context.annotation.Configuration; @Configuration @EnableAutoConfiguration @ComponentScan public class Application { public static void main(String[] args) { SpringApplication.run(Application.class, args); } } |
- 8行目: このクラスが設定用のクラスであることを指定する。
- 9行目: 自動設定を有効にする。
- 10行目: このクラスのパッケージ内のクラスをDIの対象にする。
- 13行目: ウェブアプリケーションを起動する。
設定ファイル
Spring Bootは設定が自動でされることが特徴ですが、最低限の設定はしなければなりません。またデフォルトの設定を変更したい場合もあります。その設定の方法の1つとして、application.propertiesを使う方法があります(参考: Appendix A. Common application properties)。
resourcesディレクトリにapplication.propertiesを作成します。
|
|
spring.datasource.url = jdbc:h2:file:~/tmp/mybootapp spring.datasource.username = sa spring.datasource.password = sa spring.datasource.driverClassName = org.h2.Driver spring.jpa.hibernate.ddl-auto=create-drop |
ここでは、データベースファイルの置き場所、ユーザ名、パスワード、ドライバを設定し、HibernateのDDL自動生成は、create-drop(削除して再作成)としている。
ディレクトリ構成
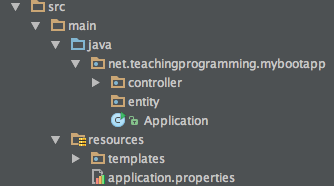
これまではWEB-INFというディレクトリがありましたが、Spring Bootのデフォルトではここは使いません。Thymeleafのテンプレートのデフォルトはresources/templatesに置きます。
実行
実行は次のようにgrablewから行います(Windowsの場合はgradlew.bat)。事前に「chmod +x grablew」として実行可能としておきます。
./gradlew bootRun
IntelliJのTerminalから実行するのがよいでしょう。
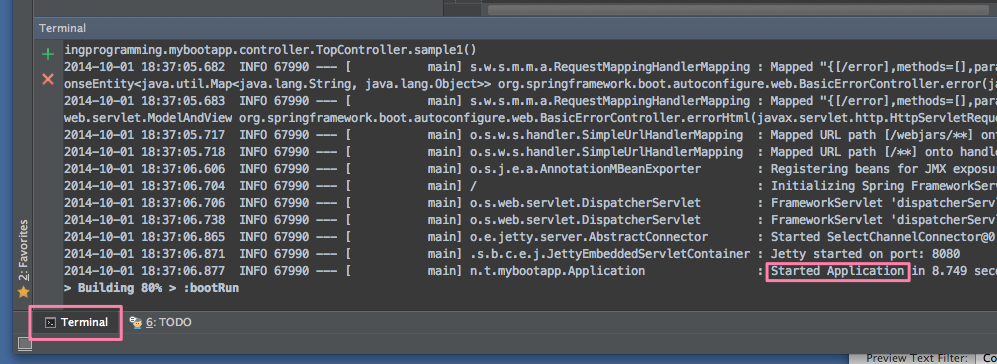
Started Applicationと表示されたら、実行中です。終了するにはキーボードからCtrl+Cを押します。


